Summary: There could be a scenario in which a tenant may want to allow their customers to customize a part of their meal selection on the customer order flow. To do this, the tenant would need to set up these customization choices based on existing individual ingredients. They would do this by creating a "customization ingredient", with a title that reflects the choice their customer will make on the order flow, that includes multiple options. This multi-option ingredient should then be added to the recipe’s ingredient list to ensure it appears on the recipe within the customer-facing order flow.
This documentation will cover the following topics:
How to create a customization ingredient in KMS
How to add a customization ingredient to a recipe in KMS
Use case example: If a tenant wants to give their customers the option to choose a side with a specific meal, they should first create a "customization ingredient" titled to reflect the choice their customer will make on the order flow (e.g., "Choice of Side"). They would then need to enable the "ingredient options" checkbox to allow for multiple choices. After creating the multi-option ingredient, the tenant should edit it by adding the side choices and any additional details they want to relay to their customers (such as upcharges or size specifications). Finally, the tenant would navigate to their desired recipe in the recipe list and add the customization ingredient to the recipe’s ingredient section. When a customer views this recipe on the order flow, the recipe will feature a "Customize" button. Upon clicking it, the "Choice of Side" title will appear, followed by the available side options, allowing the customer to select their preferred side.
How to create a customization ingredient in KMS
Navigation Instructions:
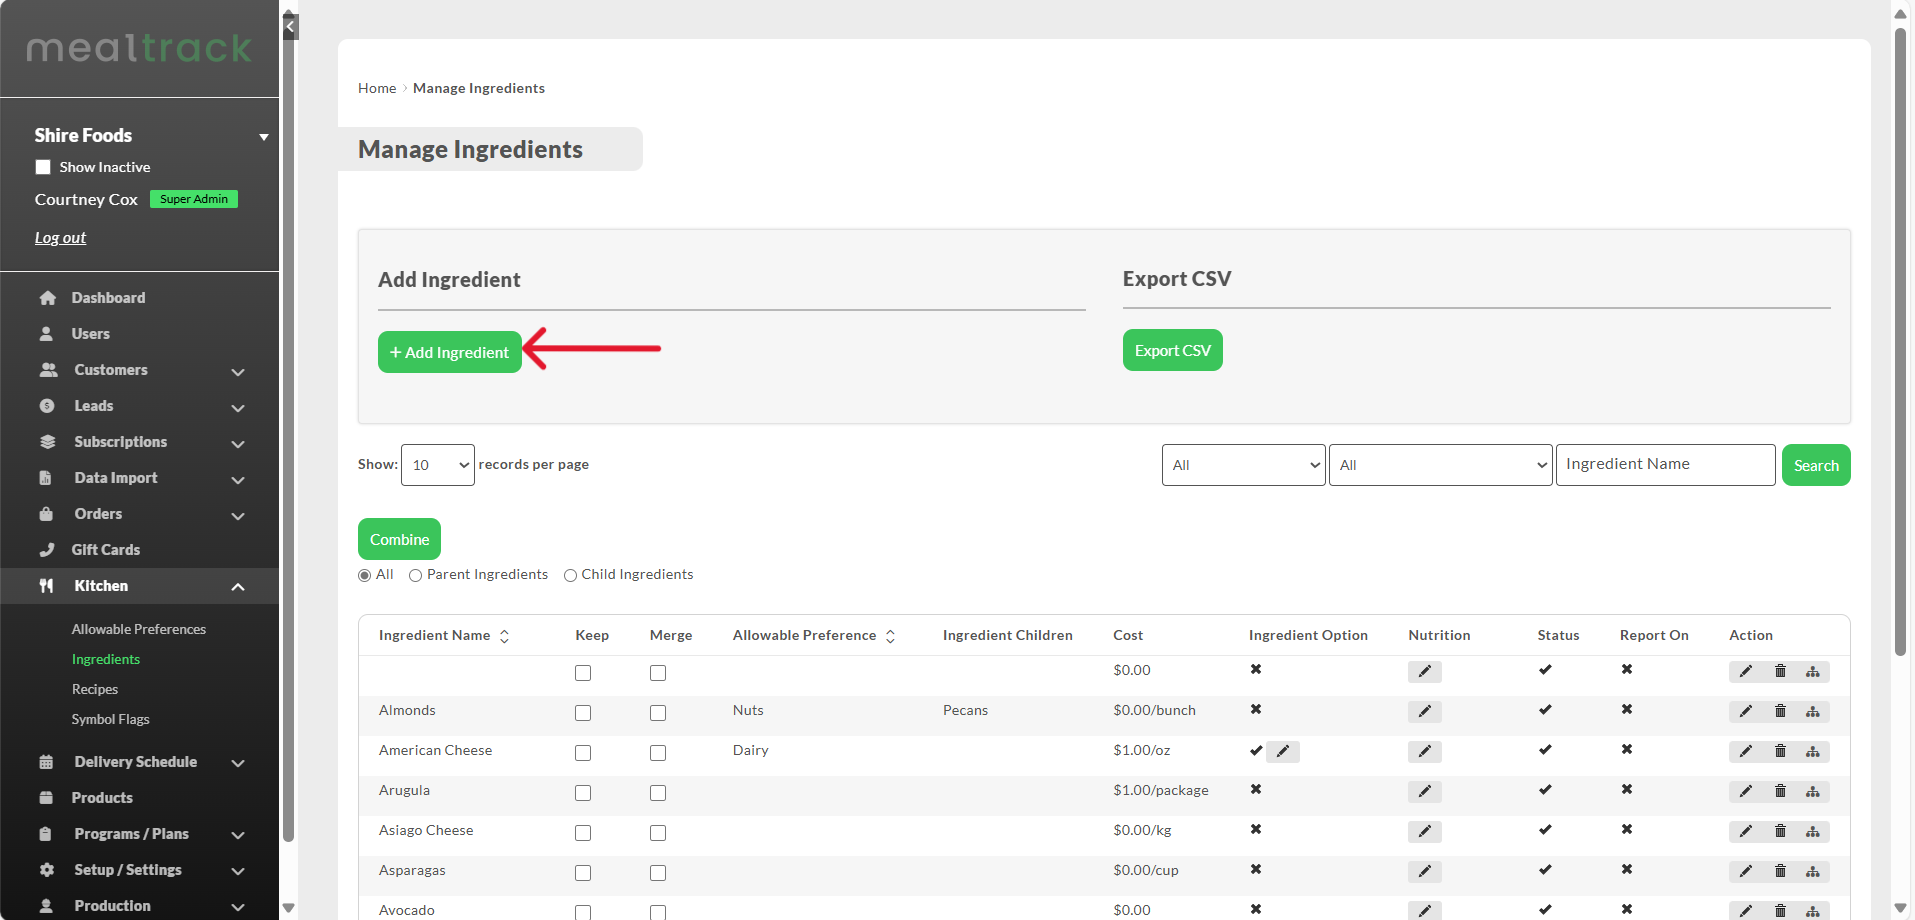
1. After logging into KMS, you can access your ingredients using one of the following methods:
a. Scroll down on your dashboard to the Kitchen section and click "Ingredients" as seen in the first picture below.
b. On the left-hand navigation bar, click "Kitchen" and then click "Ingredients" from the drop-down list as seen in the second picture below.


How-to Guide:
1. On the Manage Ingredients page, click on the green button labeled "+ Add Ingredient" under the section titled Add Ingredient.
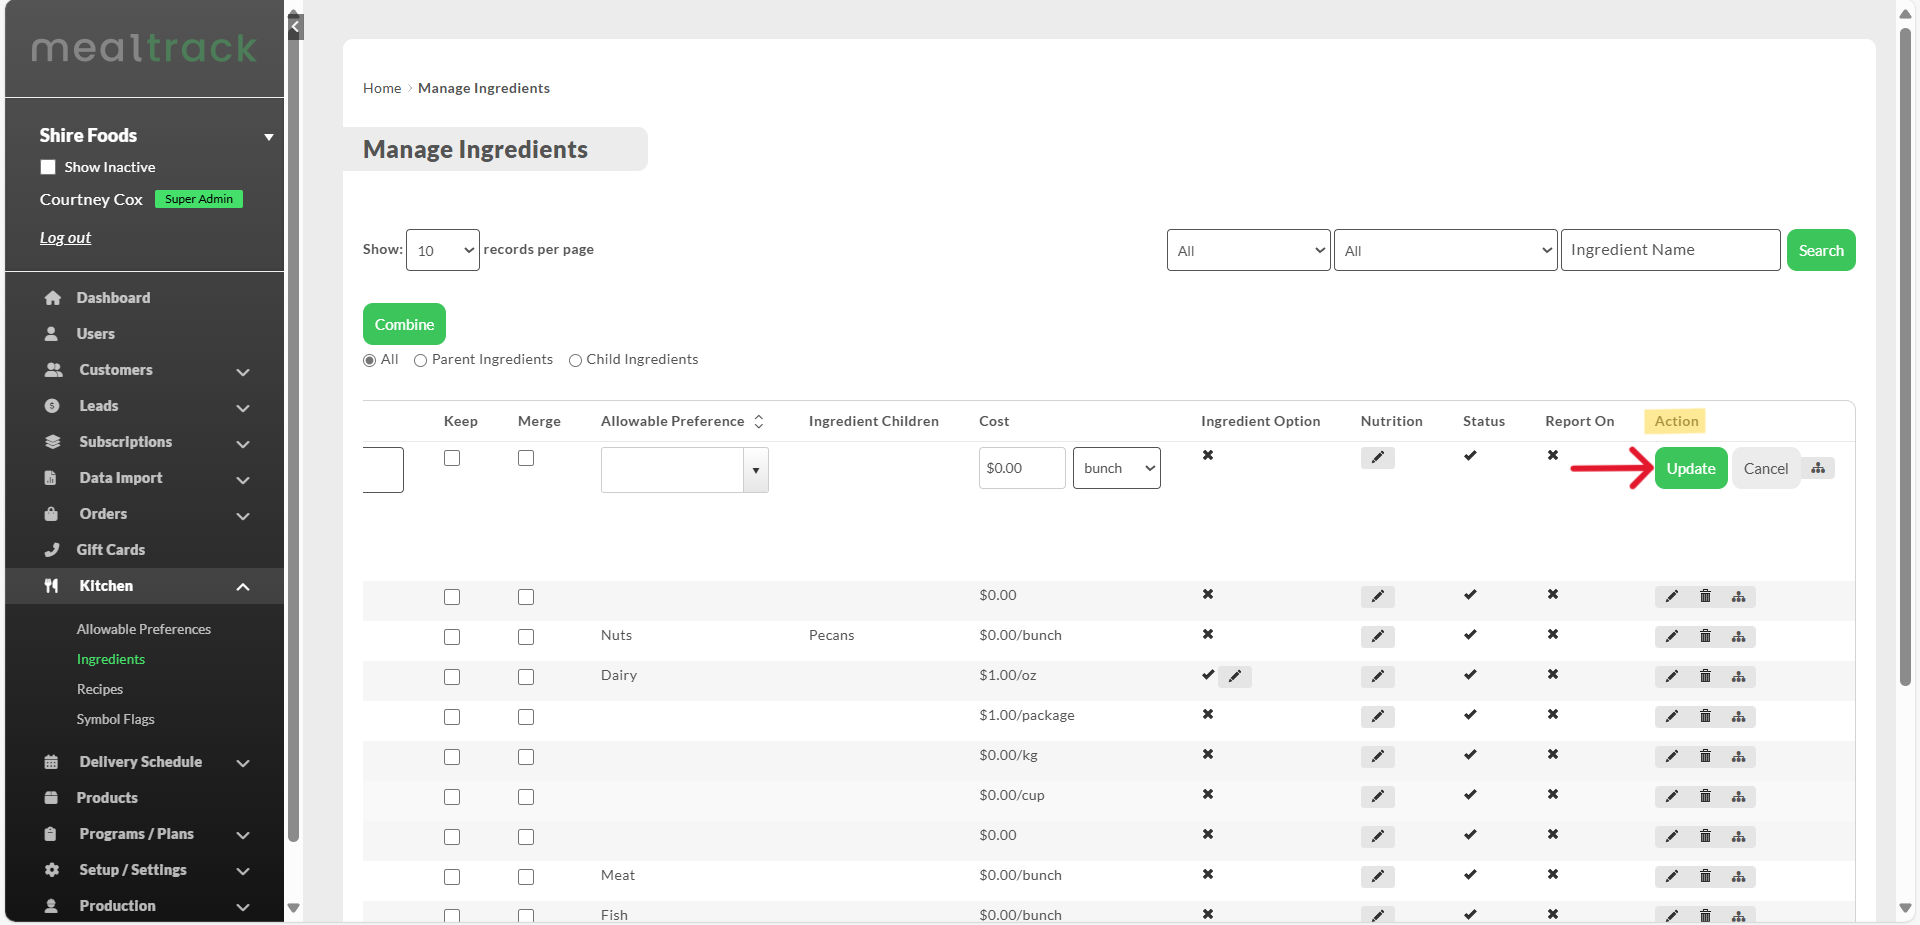
2. In the Ingredient Name text box, type in the name of your customization ingredient (e.g., Choice of Side) and click the checkbox labeled "Ingredient Option?" underneath the textbox.

3. To the right of your new customization ingredient, click the green button labeled "Update" under the section titled Action.
a. Note: You may need to scroll to the right of your customization ingredient to see the "Update" button.
4. After you locate your customization ingredient in the ingredient list, click on the pencil icon within the column titled Ingredient Option.

5. A modal will pop up titled Manage Options for: [Ingredient Name] (e.g., Choice of Side) which displays the Minimum and Maximum values at the top. You may need to manipulate the Minimum and Maximum values depending on the following scenarios:
a. If you do not want customization ingredient to be required, leave the Minimum value at its default of 0. You can change the Maximum value based on the number of options the customer can choose from. The Maximum, however, cannot exceed the total number of available options.
i. For example, if you are offering 3 side options and you are allowing customers to optionally choose up to 2, leave the Minimum at 0 and change the Maximum to 2.
b. If you do want the customization ingredient to be required, change the Minimum value to be at least 1. You can set the Minimum value to be higher than 1 if you want to require your customers to choose more than one option. The Maximum value should be set for the highest amount of options your customer is allowed to choose from, however, it cannot exceed the number of options available.
i. For example, if you are offering 3 side options and you are requiring customers to choose up to 2 sides, set the Minimum to 1 and the Maximum to 2.
6. Once you have set your Minimum and Maximum values, click the green button labeled "Save".

7. In the same modal below the section containing the Minimum and Maximum values, click the green button labeled "Add" on the right-hand side to begin adding your customization ingredient options.

8. Once you click "Add", a table will display beneath columns titled Seq., Ingredient Name, Display Name, Price, Size, and Unit.
a. Note: Each column is optional. If the columns are left blank and the ingredient option is added by clicking the button labeled "Update", the ingredient option Ingredient Name will default to "None", the Price and Size will default to values of 0, and the Unit will default to "Bunch".
i. Seq. (short for sequence) refers to the order in which your customization ingredient options will appear on the customer order flow. The numbers below the section titled Seq. depict the numerical order of the ingredient options. You can edit the order in which these ingredient options display on the customer order flow by clicking on the three horizontal lines located to the left of the column titled Seq., and dragging and dropping it when multiple ingredient options are present.
a. For example, if you fill out your first ingredient option as Sweet Potato Fries and then fill out your second ingredient option to be French Fries, but you want French Fries to appear first in the list of options on the customer order flow, you can click on the three horizonal lines next to French Fries and drag and drop it above the Sweet Potato Fries option to ensure it displays first.
ii. Ingredient Name refers to the customization ingredient selected from your existing ingredients list. To view your list of ingredients to choose from, click the down arrow in the box below Ingredient Name.
a. For example, if you are selecting the options for Choice of Side, an ingredient that you may want to choose from the existing ingredients list is French Fries.
iii. Display Name refers to how the chosen Ingredient Name will display on the customer order flow within the customization ingredient.
a. For example, if the Ingredient Name chosen is French Fries, but you want to display it in short-form, you can type in Fries in the Display Name field and only the word Fries will show on the customer order flow.
iv. Price refers to how much the ingredient option costs for the customer in addition to the recipe base cost.
a. For example, if you are providing the customer with the option French Fries and that option does not cost them any more than what the recipe base cost is, then the Price entered would be $0. However, if you want to offer French Fries with an additional cost of $1.50 on top of the recipe base cost, then you would enter $1.50 as the Price to reflect the upcharge.
v. Size refers to the association of how many Units (see below) there are of the ingredient option.
a. For example, if the ingredient option is Milk and you are offering 1 cup of Milk, you would enter a value of 1 in Size.
b. As an additional example, if the ingredient option is French Fries and you are offering 2 servings of French Fries, you would enter a value of 2 in Size.
vi. Unit refers to the unit of measurement that is associated with the Size (see above) of the ingredient option.
a. For example, if the ingredient option is Milk and you are offering 1 cup of Milk, you would enter a value of cup from the drop-down list as the Unit.
b. As an additional example, if the ingredient option is French Fries and you are offering 2 servings of French Fries, you would enter a value of servings from the drop-down list as the Unit.
9. Once you have created your ingredient option, click the green button labeled "Update" under the section titled Action.
10. To add additional ingredient options, repeat steps 8-9.

11. Once you click "Update" and your ingredient option displays, if you need to edit or delete the ingredient option, follow one of the steps below:
a. To edit the ingredient option, click on the pencil icon below the section titled Action.
b. To delete the ingredient option, click on the trash can icon below the section titled Action.

12. After you have entered all of your ingredient options for your customization ingredient, click the green button labeled "Close" in the bottom right-hand corner of the modal to finish the process.
